Key Takeaways
- Color film photography requires understanding light; overexposure is usually better than underexposure.
- Choose the right film stock based on lighting conditions and desired color outcomes.
- Fresh film provides better quality, but expired film can add unique effects.
- Proper handling and storage of film can prevent damage and preserve quality.
- Develop your film promptly to ensure the best results and prevent degradation.
Introduction
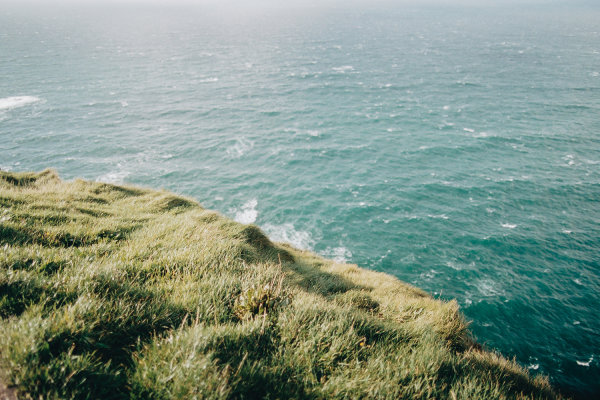
Color film has a unique ability to capture the richness and depth of the world around us. Unlike digital photography, which can sometimes feel too perfect, color film offers a more organic and authentic representation. The grain, the color shifts, and even the imperfections all contribute to the charm of film photography.
One of the main purposes of using color film is to achieve a particular aesthetic that digital cameras often can’t replicate. The colors are usually more vivid and can convey emotion and mood in a way that feels more genuine. For many photographers, color film is not just a tool but a passion. This intentionality can greatly improve your overall photography skills.
Tip 1: Importance of Proper Exposure
Exposure is the foundation of any great photograph. In color film photography, it’s crucial to get it right. Unlike digital, where you can easily adjust exposure in post-processing, film requires you to be more precise from the start.
Using a Light Meter Effectively

To achieve the best exposure, using a light meter can be incredibly helpful. A light meter measures the light in a scene and provides you with the correct settings for your camera. This tool is essential, especially when shooting in challenging lighting conditions. For more insights on light meter, check out this guide.
Remember, overexposing color negative film slightly can often yield better results than underexposing. This technique helps preserve details in the shadows, giving your photos a richer look.
Tip 2: Selecting the Right Film Stock
Choosing the right film stock is like picking the perfect paint for your canvas. Each film has its characteristics, affecting color, contrast, and grain. Therefore, selecting the right one for your needs is crucial. For instance, you might want to explore the unique qualities of Kodak Gold film to see how it can enhance your photography.
Here are some popular film stocks and their ideal conditions:
|
Film Stock |
Best Lighting Condition |
|---|---|
|
Fujifilm Pro 400H |
Daylight, portrait photography |
|
Low light, indoor settings | |
|
Bright, outdoor scenes |
Tip 3: Shooting Fresh Film vs. Expired Film
Fresh film is ideal when you want reliable color and clarity. It’s perfect for important projects where you need predictable results. On the other hand, expired film can introduce color shifts, increased grain, and other artistic effects. It’s a fun way to experiment and add a vintage feel to your photos.
Storing Film Properly
Proper storage of film is essential to maintain its quality and longevity. Whether you’re dealing with fresh or expired film, keeping it in the right conditions can prevent unwanted damage and preserve the colors and details.
Tip 4: Handling and Storing Film After Shooting
Once you’ve finished shooting, the way you handle and store your film becomes crucial. Mishandling can lead to scratches, exposure to light, or even complete ruin of your precious captures. Therefore, always be gentle and careful when handling your film rolls.

After shooting, consider these tips for proper storage.
Tip 5: The Importance of Developing Film Promptly
Once you’ve captured your images, developing your film promptly is crucial. Delaying development can lead to color shifts, loss of contrast, and even complete degradation of the image. It’s best to process your film as soon as possible to preserve the quality of your work.
Negative Lab Pro
When it comes to scanning your developed negatives, using a tool like Negative Lab Pro can significantly enhance your results. This software is designed to help you convert and edit your scanned negatives, bringing out the best in your images.
Try Negative Lab Pro
Using Negative Lab Pro for Better Scanning
It provides advanced color correction tools, allowing you to achieve more accurate and vibrant colors. Additionally, the software supports batch processing, making it easier to handle large numbers of images efficiently.
With the right tools and techniques, you can elevate your scanned images to a whole new level, making them ready for printing or sharing online.
Tip 6: Using Intentional Exposure Techniques
Mastering intentional exposure techniques can dramatically impact the quality of your color film photography. By deliberately adjusting your camera settings, you can create images that are not only technically sound but also artistically compelling.

Consider these ideas for using light and shadow creatively: explore the bokeh effect to add depth and interest to your photographs.
- Try shooting during the golden hour for soft, warm lighting.
- Use shadows to add drama and intrigue to your compositions.
- Experiment with backlighting to create silhouettes or halos around your subjects.
By playing with light and shadow, you can add a new dimension to your color film photography, making each image a work of art.
Tip 7: Photo Finishing
Experimenting with color correction can transform your film photography. While film naturally produces beautiful colors, you can enhance them further through careful post-processing. This step allows you to refine the mood and feel of your images, making them truly stand out.
Experimenting with Color Correction
Color correction involves adjusting the colors in your images to achieve a desired look. This process can be subtle or dramatic, depending on your creative vision.
Here are some tips for effective color correction:
- Start with small adjustments to avoid over-processing your images.
- Try Color Negative Pro
- Use software tools like Lightroom or Photoshop for precise control over color adjustments.
- Compare your corrected images with the original scans to ensure you’re enhancing, not detracting, from the film’s natural beauty.
With practice, color correction and grading can become powerful tools in your creative arsenal, helping you to craft images that are both visually striking and emotionally resonant.
Conclusion
Color film photography is a rewarding and creative pursuit that offers endless possibilities for artistic expression. By mastering the tips and techniques outlined in this guide, you can elevate your work and capture stunning images that reflect your unique perspective. For more information on film formats, check out this 35mm film format guide.
Remember, the most important thing is to enjoy the journey and express yourself through your images. With dedication and passion, you’ll create photographs that not only capture moments but also tell compelling stories.
Frequently Asked Questions (FAQ)
As you embark on your color film photography journey, you may have questions about getting started and improving your skills. Here are some common questions and answers to help guide you along the way.
How Do I Start with Color Film Photography?
Starting with color film photography involves a few key steps: understanding the different film formats, such as the 35mm and 126 film formats, and choosing the right one for your needs.


Leave a Reply