

Article-at-a-Glance
Understanding hyperfocal distance for optimal photo sharpness.
Using hyperfocal distance to enhance landscape photography.
Calculating hyperfocal distance with easy-to-follow steps.
Practical tips for setting up your camera for hyperfocal shooting.
Common pitfalls to avoid and maximizing hyperfocal distance in various photography genres.
What Is Hyperfocal Distance?
Simply put, hyperfocal distance is the focusing sweet spot for your camera lens that ensures everything from a certain point right in front of you to the far-off horizon is in sharp focus. It’s like having a superpower where you decide the starting line of sharpness in your photo, and from there, everything stretches out in crisp detail to infinity. This technique is especially useful in landscape photography, where you want as much of the scene in focus as possible.
Why It’s a Game-Changer for Landscapes
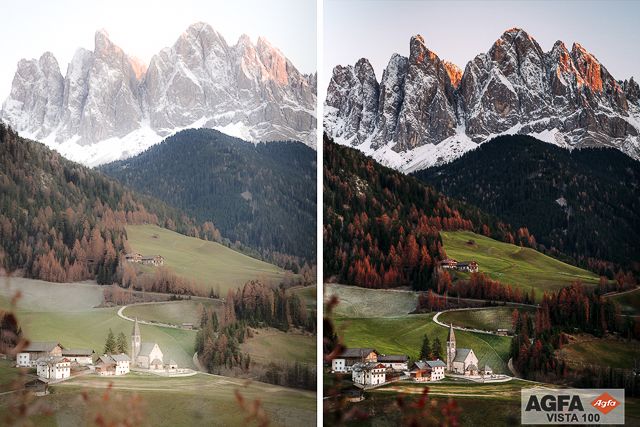
When you’re out in the wild, capturing the grandeur of nature, the last thing you want is to lose the intricate details of your scene to blur. By using hyperfocal distance, you ensure that everything from the delicate flowers at your feet to the rugged mountains in the distance is as sharp as a tack. This isn’t just about getting more likes on your photos – it’s about truly doing justice to the beauty that you’re witnessing.
Hyperfocal Distance Basics for Beginners
Now, before you start thinking that this sounds like a complex mathematical equation, let me assure you, it’s quite straightforward. You don’t need to be a math whiz to figure it out. In fact, with a few simple tips and a bit of practice, you’ll find that using hyperfocal distance becomes second nature.
Focal Length and Aperture
The first thing you need to understand is that your camera lens has a focal length – this is the distance from the lens to the sensor when your subject is in focus. The focal length determines how much of the scene in front of you will be captured. Then there’s aperture – the opening in your lens through which light enters. The aperture size, denoted by f-numbers like f/2.8, f/4, f/8, and so on, affects the depth of field, which is how much of your image is in focus.
When you adjust these two settings, you change the depth of field. A smaller aperture (a larger f-number) gives you a wider depth of field, and that’s where hyperfocal distance comes into play. It’s about finding that perfect focus point where everything from half the distance to your hyperfocal point, all the way to infinity, is sharp.
Depth of Field and Its Relationship with Hyperfocal Distance
Depth of field is like a three-dimensional zone of sharpness in your photo. It’s not a fixed distance but rather a range that can be shallow or deep. With a shallow depth of field, only a small part of the image is in focus, often used for portraits where you want a creamy, blurred background. A deep depth of field, on the other hand, keeps a lot more of the image sharp, which is ideal for landscapes.
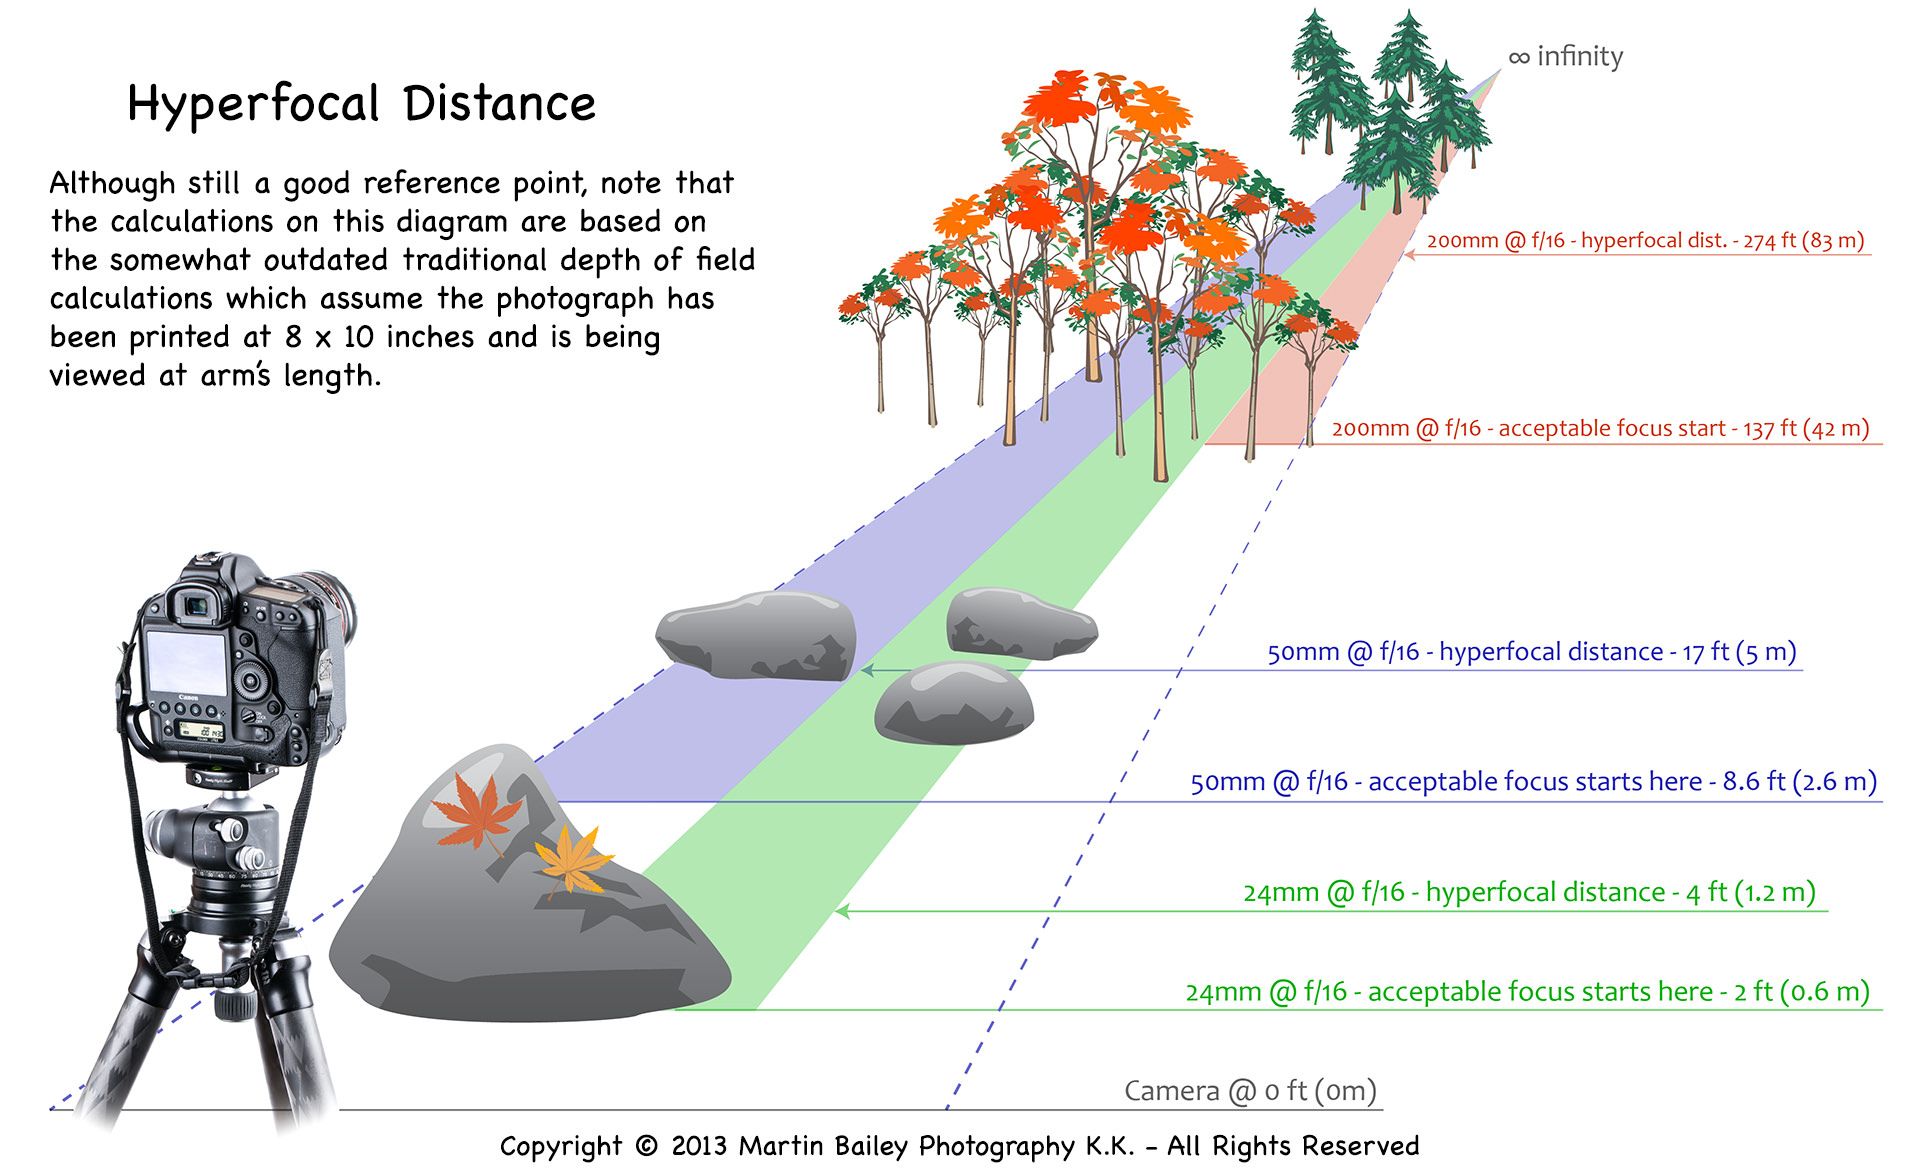
Hyperfocal distance is the focus setting that gives you the maximum depth of field for a given aperture and focal length. It’s the point at which everything from halfway between you and that point, to infinity, appears sharp. It’s a technique that allows you to take full advantage of the depth of field available from your lens and aperture combination.
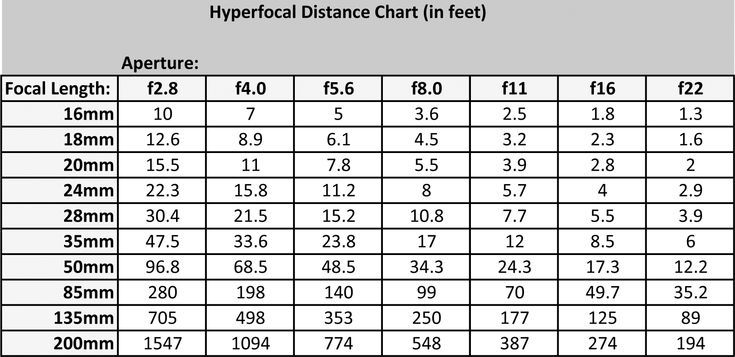
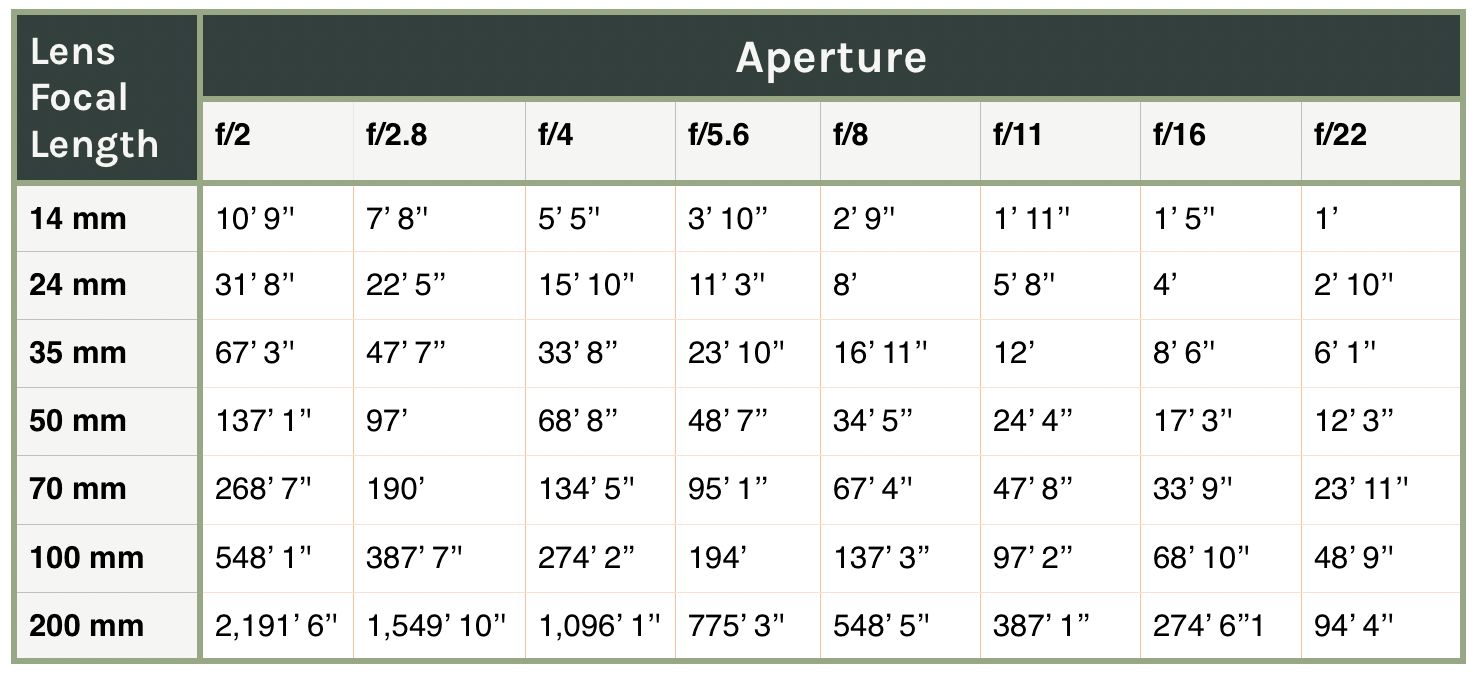
Calculating Hyperfocal Distance
Calculating hyperfocal distance may seem daunting, but with the right tools, it’s a breeze. You have two primary options: using a hyperfocal chart or a calculator. A chart gives you a quick reference based on your camera’s sensor size, focal length, and aperture. A calculator, often available as an app for your smartphone, lets you input your specific settings to get a precise hyperfocal distance. Both have their place in your photography toolkit, so let’s weigh their pros and cons.
Remember, the hyperfocal distance changes with every alteration in focal length and aperture. So, if you adjust your settings, you’ll need to recalculate. It’s a dynamic process that responds to your creative choices, and that’s part of the fun!
You might find it easier to watch a YouTube video right here.
It’s also important to note that the hyperfocal distance is a theoretical value that assumes ideal conditions. Real-world factors like lens quality and atmospheric conditions can affect the actual depth of field achieved.

Achieving Perfect Focus in the Field
First, switch your lens to manual focus. If your lens has a distance scale, use it to set the focus to the hyperfocal distance you’ve calculated. If it doesn’t, use live view mode to zoom in on an object at that distance and adjust the focus until it’s sharp.
Next, frame your shot and take a test photo. If the foreground isn’t as sharp as you’d like, refocus slightly closer than your hyperfocal distance and try again. This is a process of fine-tuning that can yield stunning results.
Once you’re happy with the sharpness throughout the scene, you’re ready to capture the final image. Remember to keep your camera settings consistent to maintain the depth of field you’ve established.
With each shot you take using hyperfocal distance, you’ll gain a better feel for how your specific camera and lenses behave, leading to more intuitive and quicker setups in the future.
Advanced Tips and Traps to Avoid with Hyperfocal Focusing
As with any technique, there are advanced tips that can help you get even more out of hyperfocal focusing, as well as traps you’ll want to avoid. For instance, don’t assume that setting your lens to infinity focus will yield sharp results – often, this will leave your foreground out of focus. Instead, use the calculated hyperfocal distance to ensure sharpness throughout.
Another tip is to use the depth of field preview button on your camera if it has one. This will stop down the lens to your chosen aperture, allowing you to see the actual depth of field through the viewfinder.
Common Mistakes and How to Circumvent Them
One common mistake is not recalibrating the hyperfocal distance when you change your focal length or aperture. Always remember that any adjustment to your settings requires a new calculation. Another mistake is relying too much on the depth of field scale on older lenses, which may not be accurate for today’s high-resolution cameras.
By understanding these nuances and practicing regularly, you’ll find that hyperfocal distance is a powerful tool in your photography arsenal, one that can significantly enhance the impact and professionalism of your images.
FAQ
Can Hyperfocal Distance Be Used for All Types of Photography?
While hyperfocal distance is a concept most commonly used in landscape photography, it can be applied to any genre where a deep depth of field is desirable. This includes architectural and street photography, where you might want both the foreground and background elements to be in focus. However, it’s less useful in genres like portraiture, where a shallow depth of field is often preferred to isolate the subject from the background.
How Does Sensor Size Affect Hyperfocal Distance?
Sensor size plays a significant role in determining hyperfocal distance. A larger sensor, such as a full-frame sensor, will have a longer hyperfocal distance at a given aperture and focal length compared to a smaller sensor, like an APS-C or micro four-thirds sensor. This is because larger sensors have a shallower depth of field at the same aperture. Therefore, when you’re calculating hyperfocal distance, always ensure that you’re using the correct parameters for your camera’s sensor size.

