Key Takeaways
-
The Sunny 16 Rule is a foolproof method for setting the correct exposure on sunny days without a light meter.
-
To use the rule, set your aperture to f/16 and match your shutter speed to the reciprocal of your film’s ISO.
-
This guide is adaptable for various weather conditions by adjusting the aperture accordingly.
-
Practicing the Sunny 16 Rule will enhance your understanding of light and improve your manual photography skills.
-
Remember, the rule serves as a starting point; experience and experimentation will refine your technique.
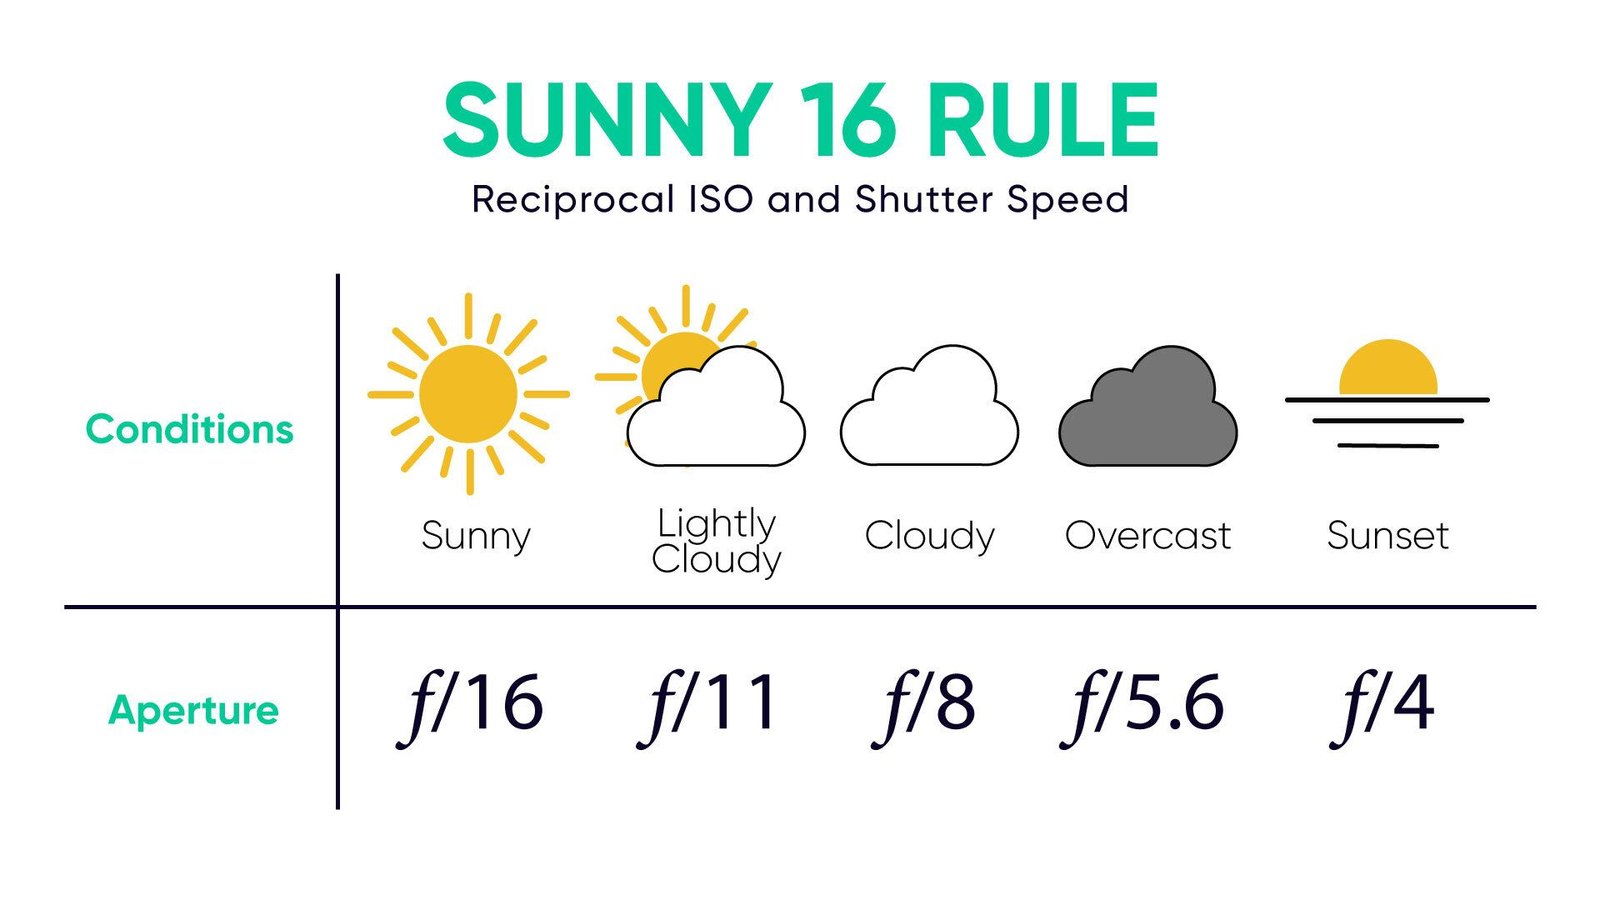
Photo by https://greatbigphotographyworld.com/
Capturing the Light: Mastering the Sunny 16 Rule
What Is the Sunny 16 Rule?
So, what exactly is this Sunny 16 Rule? It’s a guideline that says, on a sunny day, if you set your camera’s aperture to f/16, your shutter speed should be the inverse of your film’s ISO. For instance, if you’re shooting with 400 ISO film, your shutter speed should be 1/400th of a second (or the closest available, like 1/500th).
Why Every Photographer Should Know This Golden Trick
It’s an essential piece of knowledge for any photographer who wants to take control of their camera. It’s like having a secret weapon when you’re out shooting, especially if you’re working with a fully manual camera or if your battery-powered light meter decides to take the day off. Plus, understanding exposure is fundamental to photography, and the Sunny 16 Rule gives you a hands-on way to learn it.
Setting the Stage: Your Camera and the Sun
Before we dive into the nitty-gritty of the Sunny 16 Rule, let’s set the stage. You’ll need a camera that allows for manual control of aperture and shutter speed, and a roll of your favorite film. If you’re new to film photography, this might feel like learning a new language, but don’t worry. With a bit of practice, you’ll be speaking fluent ‘photographer’ in no time.

Photo by https://www.dpreview.com/
Choosing the Right Film for Sunny 16
When it comes to film, the ISO is key. It’s the measure of the film’s sensitivity to light. Lower ISOs (like 100 or 200) are less sensitive and ideal for bright conditions, while higher ISOs (like 800 or 1600) are more sensitive and better for low-light situations. But for the Sunny 16 Rule, any ISO will do, as long as you know how to adjust your settings accordingly.
Adjusting Manual Settings on Your Camera
Got your film loaded? Great! Now, take a look at your camera. You’ll typically find the aperture settings on the lens ring, marked with numbers like f/16, f/11, f/8, and so on. The shutter speed dial is usually on the top of the camera, marked with numbers representing fractions of a second. These are the two things you’ll be adjusting to use the Sunny 16 Rule.
Reading the Weather: How Sunlight Changes Your Settings
-
Bright Sun: Stick with f/16.
-
Slight Cloud: Move to f/11.
-
Overcast: Open up to f/8.
-
Heavy Overcast: Go wider to f/5.6.
-
Shade or Sunset: Try f/4 or even f/2.8.
-
Bright Sun. Now, the Sunny 16 Rule assumes you’re basking in the glory of a bright, sunny day. But the light changes with the weather, and so should your camera settings. For 400 ISO is 1,500 exposure for a sunny day is always going to be F-16, the best part about this is that it never changes.
-
Slight Cloud. However, if there are a few clouds, switch to f/11. Why? Because those clouds are softening the sunlight, and you need to let in just a bit more light to maintain the right exposure. If there are a couple of clouds outside but the sun is still poking through if it’s a little bit darker than just complete sunlight than use f11, it’s going to be the same thing with shutter speed you match the shutter speed to your ISO.
-
Overcast. Now let’s say you’re outside and there are a reasonable amount of cloud out there, but it’s not overcast. You open up your lens to f8 and I want to stress that f8 is not overcast there are a lot more clouds out there more than what f11 would have f11 is just one two maybe five or six clouds out there but it’s not completely overcast.
-
Heavy Overcast. With F5, F6 I found out that it’s overcast, but it can also be in shade. So if you’re under a tree on a sunny day or even on a day that’s like f11, but you are in a shade of a store roof than use F5.6
These adjustments are your cheat codes for real-world lighting scenarios. Keep them handy, and you’ll be ready for whatever the sky throws your way. The key is to keep an eye on the light, because it’s always on the move, just like you. Learn more about sunny 16 in this excellent YouTube video

Photo by https://petapixel.com/sunny-16-rule/
Special Cases: Snowy Scenes and Sunsets
There are times when the light is tricky, like when you’re surrounded by the reflective surfaces of a winter wonderland or during the golden hour of a sunset. Snow can act like a giant reflector, bouncing light everywhere and potentially leading to overexposure. In these cases, you might want to stop down to f/22 to compensate for the extra brightness. Here is where the light meter comes in handy. For more detailed information, check out this light meter guide in film photography to help you with tricky lighting situations.

Photo by https://www.dpreview.com/
As for sunsets, they’re a bit of a wildcard. The light is warmer and less intense, so starting at f/16, you might quickly find yourself opening up to f/8 or wider as the sun dips lower. The key here is to watch the light closely and adjust as needed. It’s a dynamic scene, and your settings should be just as fluid.
Practice Makes Perfect: Learning to Trust Your Judgement
Practice really does make perfect. The more you use the Sunny 16 Rule, the better you’ll understand the relationship between light and your camera. Start by taking notes of your settings and the resulting images. Over time, you’ll build a mental database of what works and what doesn’t. Trust your judgement; it’s your most valuable tool.
Remember, photography is as much an art as it is a science. There are rules, yes, but there’s also intuition, feeling, and the unique way you see the world. Use the Sunny 16 Rule as a guide, but don’t be afraid to experiment. Sometimes, the best shots come from bending the rules a little.
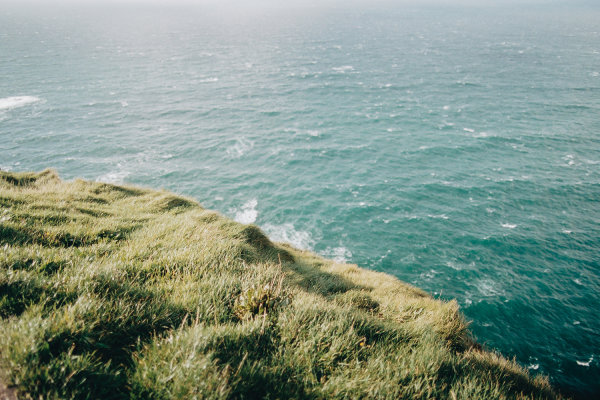
The Visual Proof: Examples of the Sunny 16 in Action
Let’s bring it all together with some visual examples. Imagine a beach scene under the midday sun. You set your aperture to f/16, your shutter speed to 1/500th for your 400 ISO film, and you capture the sparkling sea and the bright sand with perfect clarity. Now, picture the same beach as the clouds roll in. You switch to f/8, and the resulting image has a softness to it, a gentle quality that wasn’t there before. For more insights, explore this guide on using the Sunny 16 Rule for film photography.

Photo by https://www.pinterest.com/pin/363313894932801814/
Learning from Common Mistakes and How to Avoid Them
As with any technique, there’s a learning curve to the Sunny 16 Rule. One common mistake is forgetting to adjust the aperture when the lighting condition changes. Always be mindful of the light around you. If clouds appear, or if you move into the shade, adjust your settings accordingly. Another mistake is not accounting for reflective surfaces, like snow or water, which can lead to overexposure. When in doubt, bracket your shots—take multiple exposures at different settings to ensure you get the perfect shot.
FAQ: Answering Your Burning Questions
Can Sunny 16 Rule Be Applied to Digital Photography?
Absolutely! The Sunny 16 Rule isn’t exclusive to film photography. It’s a fundamental principle of exposure that applies to digital cameras as well. The only difference is that with digital, you can check your results immediately and make adjustments on the fly. This makes practicing the rule even easier for those just starting out.
-
For digital cameras, set your ISO to 100 for full sunlight.
-
Use the camera’s histogram to check the exposure and adjust if necessary.
-
Remember, the Sunny 16 Rule is a starting point—fine-tune your settings based on the image preview.
How Does the Sunny 16 Rule Work for Indoor Photography?
Indoor photography with the Sunny 16 Rule can be a bit tricky because it’s designed for natural light. However, you can still use the rule as a starting point. If you’re indoors with good natural light coming through windows, start with the rule and then open your aperture wider or slow down your shutter speed to compensate for the reduced light. For more guidance on managing light and exposure, check out our comprehensive guide on aperture, depth of field, and shutter speed in film photography.
For example, if you’re shooting with 400 ISO film and it’s fairly bright indoors, you might start with f/16 and then open up to f/4 and adjust your shutter speed to 1/60th of a second or slower. Always keep an eye on the light and be ready to adapt.
What If My Camera Does Not Have ISO 100?
If your camera’s lowest ISO setting is higher than 100, don’t worry. You can still use the Sunny 16 Rule by adjusting your shutter speed to match your lowest ISO. For instance, if the lowest ISO your camera offers is 200, then set your shutter speed to 1/200th of a second on a sunny day with the aperture at f/16.
Can I Use Sunny 16 for Portraits and Moving Subjects?
Yes, the Sunny 16 Rule can be applied to any subject matter, including portraits and moving subjects. The key is to ensure that your shutter speed is fast enough to freeze motion. For moving subjects, you may need to choose a faster shutter speed than the ISO suggests, which means you’ll have to open your aperture to maintain the correct exposure.
For portraits, consider the quality of light on your subject’s face. You might want to adjust your aperture to create a more pleasing depth of field, or move your subject into the shade for softer lighting, then adjust your settings accordingly.
How Do I Adjust for Different Film Speeds Using Sunny 16?
Adjusting for different film speeds is straightforward with the Sunny 16 Rule. If you’re shooting with a slower film, say 100 ISO, set your shutter speed to 1/100th of a second under full sun. For faster film, like 800 ISO, set your shutter speed to 1/800th of a second, or the closest available speed. For more detailed guidance on using various film speeds, check out our comprehensive guide on light meters for film photography.
Remember, the Sunny 16 Rule is all about the relationship between aperture, shutter speed, and ISO. Once you understand how these three elements work together, you can adjust your settings to suit any film speed and lighting condition.
Understanding the Sunny 16 Rule is essential for film photographers who want to master exposure without relying on a light meter. This rule helps to estimate the correct exposure on a sunny day and can be adjusted for other lighting conditions. By using the Sunny 16 Rule, photographers can achieve well-exposed photographs by setting the aperture to f/16 and the shutter speed to the reciprocal of the ISO film speed (e.g., ISO 100 film = 1/100 second shutter speed).


Leave a Reply